
How to Make an Online Quiz
Learn how to create a quiz for fun, education, or business
In this guide
Make a Free QuizCreating your own online quiz is easier than you think. Whether you’re crafting a fun trivia challenge for friends, designing an engaging educational tool for students, or building an interactive marketing quiz to generate leads, there’s no need to feel overwhelmed by the countless options out there—from Google Forms to SurveyMonkey. In this guide, we’ve got you covered with simple steps and expert tips, demonstrating how Quiz-Maker makes quiz creation effortless, fast, and coding-free. Ready to dive in? Make a Quiz for Free now using one of our quiz templates or follow the easy steps below
How to make a free online quiz in 5 simple steps
-
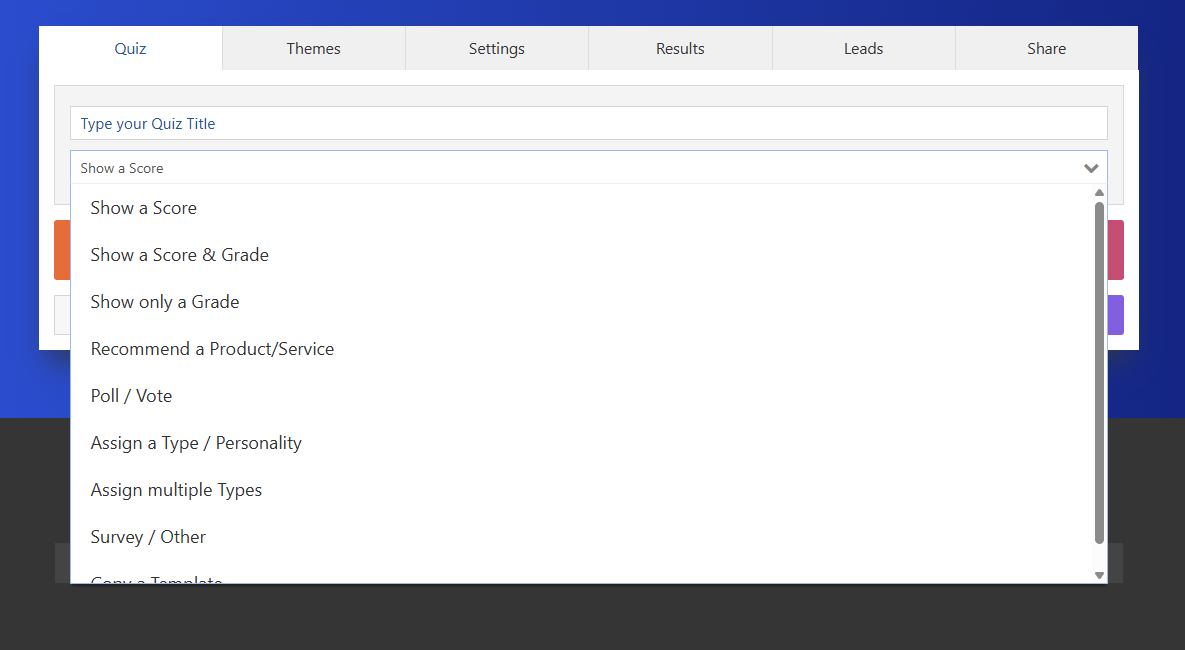 Select your quiz type from the dropdown menu on the quiz maker homepage. The quiz type labels show what you want your quiz to take—provide a score/grade, service recommendation, personality or product recommendation, survey to gather insights, and more. This categorization ensures you start with the correct format and sets smart defaults so you need to do very little to publish your quiz.
 -
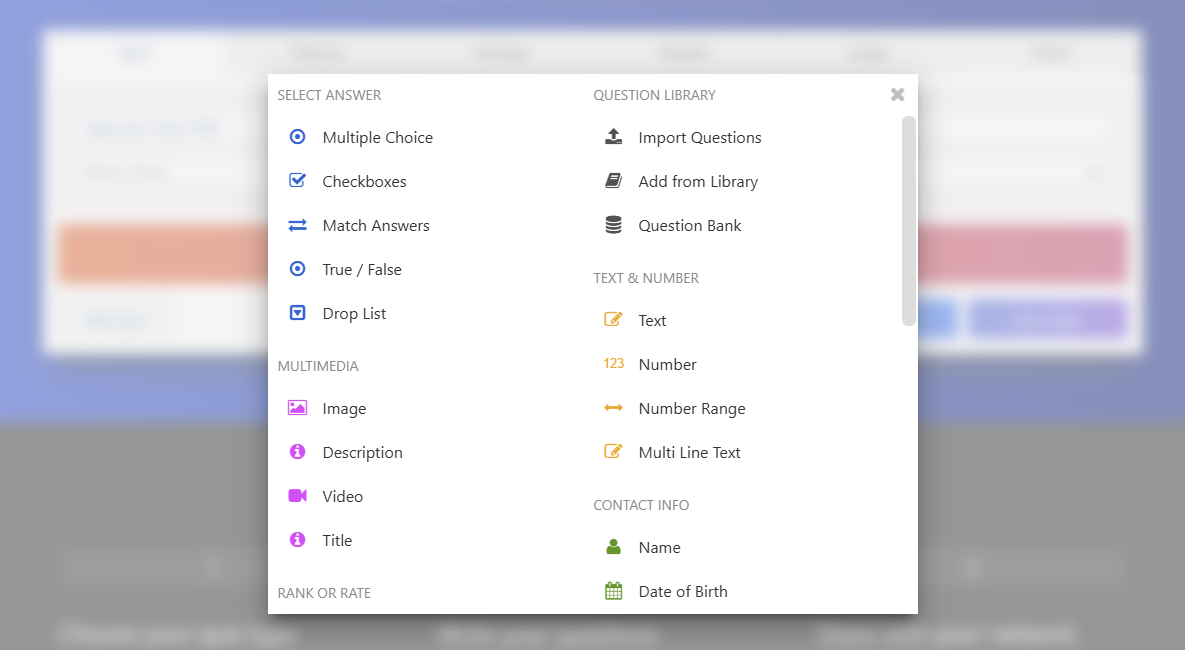 Click Add Question to unlock over 40 question formats—Multiple Choice, Image Choice, True/False, and more. For school-assignment quizzes, select Multiple Choice. The question dialogue will appear; enter your prompt, use the picture icon to add an image, and define your answer options.
 -
After composing your question, enter the answer choices. If you've selected a quiz type which assigns a grade or score you'll see an option to tick 'correct' on your answers. Add a few answers and you’re done with the question.
-
You can now adjust the look and feel of your quiz by choosing a theme on the 'Themes' tab. This step is optional but allows you to tailor colors and styles. On the 'Settings' tab, you can modify quiz behavior and how users interact with it.
-
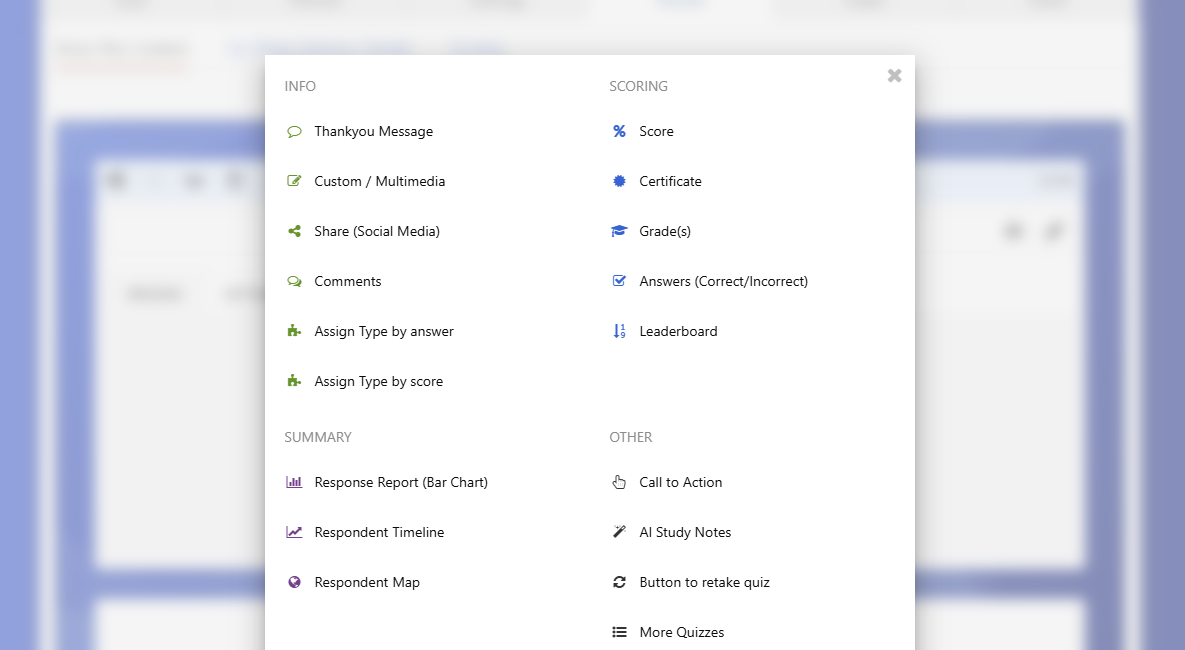 On the 'Results' tab, preview how your results will display. If your quiz assigns grades or recommendations, add your types, describe them, and assign them to answers from step 1. When ready, click Share and collect responses.
How to create a quiz with AI
Creating an AI-powered quiz has never been easier. QuizMaker uses advanced AI trained on hundreds of thousands of quizzes to effortlessly create your quiz from a simple description.
To create your quiz with AI:
-
Start Your Quiz: On the QuizMaker homepage, click the Generate Quiz Automatically button.
-
Describe Your Quiz: Enter a clear and detailed description of your quiz. Specify your target audience, subject, and exactly what you want the quiz to assess. For example, instead of saying "English history quiz," you could say, "A quiz on English history aimed at high school students, focusing on major events from the 19th century."
-
Generate Your Quiz: Click the Build Quiz button. The AI will quickly create your quiz, typically taking just a few seconds. You'll see a prompt once it's ready.
-
 Review and Edit Questions: Click Start to view the questions generated by the AI. Each question includes correct and incorrect answers, and they're automatically added to your quiz. You can accept these questions as-is or choose to reject and edit them individually to better suit your needs.
 -
Finalize Your Quiz: Once you're satisfied, click Add Questions to Quiz on the left-hand side. Your quiz is now ready to use.
-
Share and Collect Responses: You can immediately share your quiz to start collecting responses, or further customize it as needed.
-
Add More AI-Generated Questions (Optional): If you decide to expand your quiz later, simply click the More AI Questions button at the bottom.
Enjoy creating engaging quizzes quickly and effortlessly with QuizMaker's powerful AI!
Quiz Maker Frequently Asked Questions (FAQs)
How do I make a quiz for free?
As mentioned above there are many tools available which allow you to create free online quizzes for personal use. If you want to make a free online quiz there will likely be ads and a few limits imposed on your quiz so it's important to understand these before you publish your quiz. If you're just looking to create a quiz to help you study for an exam you can use our Quiz maker for free or a tool like Quizlet. To get started here is how you make a free quiz with our Quiz Maker:
- Add your questions and select your quiz type on the homepage
- Select the correct answers
- Enter a title for your quiz
- Hit Share and enter an Email and Password
You can add up to 25 responses for free; afterwards your quiz will continue to work you just won't be able to see the additional results in the QuizMaker Dashboard.
How do I add certificates to my quiz results?
You can assign a certificate based upon a score, grade, outcome or simply provide them to all who complete your quiz. The certificate will be presented in results and also be available to participants for a PDF download.
- After you've added questions to your quiz hit the “Results” tab
- Hit +Content and select Certificate
- Set the conditions under which you'd like your certificate to appear
- Hit Edit Certificate and the Certificate editor will load
- From here you can tailor the text and background of the certificate
If you wish to use your own certificate background we suggest an image size of 3500px x 2400px to ensure the highest quality possible.
How do I add a leaderboard to my quiz?
You can show a ranked leaderboard at the end of your quiz to inspire a little healthy competition. To appear on the leaderboard your quiz takers will need to enter a name.
- If you haven't already done so add the “Name” question. The name entered here will be used in the Leaderboard
- On the Results tab +Content and select the Leadboard Option
How do I collect email addresses or leads with my quiz?
You can choose to require an email address to be entered at the end of your quiz in order to view results. This serves as a great way to begin an ongoing dialogue for either marketing or education purposes.
- Add your quiz questions
- Hit the “Leads” tab and tick “Lead Capture”
- You can now edit the questions asked in lead capture
If you check your results and don’t see lead capture entries it means participants closed the quiz at the point in which we asked for an email address. If you're seeing too much dropout either consider increasing the incentive or allowing lead capture to be skipped.
How do I change the look and feel of my quiz?
There are 40+ default themes to choose from and a custom theme editor. The editor can be used to change background images, colors and fonts to match your branding. The results will automatically be styled to match your quiz theme.
- Add your quiz questions
- Hit the “Themes” tab to choose a preconfigured theme
- Hit “Customize” to add your own background, colors and fonts
If you're feeling more adventurous and are familiar with CSS hit Settings → Plugins → View Add Plugins. From here you can create your own plugin to add your own custom CSS. If you're not experienced with front-end design it’s best to stick to the custom editor described above.
How do I send out invites to quiz takers?
There are a few ways to share your quiz online. By default your quiz will run on our cloud and be optimized to run on mobiles, tablets and desktops. You can choose to embed your quiz on your website. You can also control who gets to take your quiz with unique codes and passwords.
- Add your quiz questions
- Hit the “Share” tab
- You can choose to share the link directly or copy and paste embed code
Unique Codes – Require a single-use code to be entered when the quiz starts. The code may only be used once by one person. This is a great way to ensure your quiz is not taken multiple times by a single person.
How do I access my quiz maker results?
- Log into the Quiz Maker Dashboard
- Hit the Results icon of your quiz
- You'll see a list of results options
| Section | Content |
|---|---|
| Charts | Show graphs for all responses combined. See pie charts and bar graphs showing how your respondents answered. |
| Export | Export raw individual results to a CSV or Excel file for download. Includes score and outcomes where appropriate. |
| Individual Responses | View a list of each completed response to view individual participant answers. You can search for a particular response by answer data. |
| Map Responses | Shows a geographical map of where your respondents are based. This can be turned off for privacy with plugins. |
| Timeline | Shows when over time you received responses. This can be useful for analyzing the effectiveness of marketing campaigns. |
| Education Level | Relates to the highest level of education that an individual has completed, including primary, secondary, tertiary, and postgraduate studies. |
| Share | You can choose to share a link to make your quiz results public. |